

How to Kill Grubs & Garden Soil Pests Organically w/ Beneficial Nematodes

Last Updated on September 16, 2023
Grubs getting you down? I feel you! We struggled with pesky white grubs in our soil for years. That is, until we found an easy and organic way to kill grubs in garden soil – which is what I want to share with you today. About six months ago, we treated our raised bed garden soil with beneficial nematodes in high hopes to get rid of the grubs. I am happy to report they seem to be completely gone!
Apparently, beneficial nematodes are so effective at killing grubs in soil that I had to search our property for over 30 minutes to find the seven measly grubs I collected for this article’s photo shoot. I dug them up from flower beds around the perimeter of the yard, but couldn’t find any in the raised garden beds where we previously introduced beneficial nematodes. Before treating with beneficial nematodes, I could have found seven grubs in seven seconds flat! Our garden beds were literally crawling with them.
So, are you ready to kill some grubs? I know, it sounds a bit mean… but once you read how much damage they can do to your garden, I think you’ll be on board.

What are Curl Grubs?
Many species of soil-dwelling grubs are lumped into a group commonly known as “curl grubs”. They get their name due to their tendency to curl up into a C-shape when disturbed. Curl grubs are also sometimes called “white grubs”. This is because they’re all white in color (slightly opaque), with a blue-grey butt and reddish-orange head and legs. In their larval stage, it is difficult to differentiate between species.
More specifically, curl grubs are the larvae of a number of species of cockchafer or Scarab beetles. Common curl grub beetles include Japanese Beetles, African Black Beetles, June Bugs, European Chafers, the Blackheaded pasture cockchafer, and Christmas beetles. Adult beetles lay eggs in the soil, the eggs hatch into larvae, and the larvae (grubs) grow and feed in the soil. Eventually, the grubs turn into beetles and emerge from the soil – and the cycle repeats itself.

Damage Caused by Curl Grubs in Garden Soil
Curl grubs feed on some dead plant matter, but also actively feed on the living root systems of a wide range of plants. The exception is that they do not particularly care to eat legumes (peas and beans). As we organic gardeners know, roots are the foundation of plant health! Thus, when plant roots are eaten by grubs, the plants become stressed, stunted, and increasingly susceptible to disease. Heavy infestations of curl grubs in garden soil can even cause plant death. That is why we want to get rid of those nasty suckers!
The good news is, if you kill the grubs in your soil, you’re also reducing the subsequent beetle population – and many of them are garden pests as well! Nearly all curl grubs emerge from the soil as adult beetles in May to June. Then, the beetles begin to feed on surrounding landscape plants. Japanese Beetles are especially notorious for damaging and devouring leaves on garden plants. I think most of the grubs in our garden soil are June Bugs, who also chew ragged holes in plant foliage.
Beyond garden soil, grubs are commonly found in grass lawns. A grub infestation in lawn creates dead patches of grass that stay yellow and sad-looking, no matter how much water or care the area receives. You can use beneficial nematodes to kill grubs in garden soil and lawns alike.

4 Organic Ways to Kill Curl Grubs in Garden Soil
There are a number of organic ways to kill curl grubs in garden soil. Our method of choice is to use beneficial nematodes, which is what I will focus on most in this article. However, I always like to provide you with alternative information and options!
1) Tilling & Hand-Picking
Before we tried using beneficial nematodes, we followed the good old “collect them when you see them” method! I have read many recommendations to till and turn up your soil each season to expose the grubs, and then manually collect and dispose of the ones you unearth.
While this method may help put a small dent in the population, there is no way you can get them all. Furthermore, we try to follow a mostly “no-till” philosophy in our garden, and this option directly conflicts with that. Of course it is always a good idea to snatch them when you see them, though I wouldn’t rely on this method alone.

2) Apply Milky Spore
One natural and organic substance you can apply to garden soil or lawns to kill grubs is called Milky Spore. When introduced under the right conditions, the curl grubs ingest the Milky Spores who parasitize and effectively kill them over a few weeks timespan. As the grubs die, more milky spores emerge from their decaying bodies and can spread to continue the “infection” to other grubs in the area.
While it sounds fairly simple, it is my understanding (after a bit of research) that Milky Spore needs to be applied under very particular conditions to be effective. Namely, the grubs must be in an active feeding stage to ingest the spores. The soil also needs to be at least 65 degrees Fahrenheit.
3) Use Bacillus thuringiensis var. galleriae
Like milky spore, bacillus thuringiensis (also known as Bt) is another natural but parasitic biological agent that can kill grubs in garden soil. Bt is a bacterium, and there are a few different strains. Bt galleriae in particular is effective at killing curl grubs or beetle larvae. A different and more common Bt is used to kill caterpillar larvae from pest moths and butterflies, such as cabbage worms.
Bt is applied to the soil, actively feeding grubs ingest it, and then protein is released inside the grub that interferes with their digestive system. The grubs stop eating and die. It doesn’t harm any other insects, species, or wildlife. However, like milky spore, Bt needs to be applied carefully and correctly in order to work. For example, it must be physically ingested by the grubs, it rapidly degrades in sunlight, and has a residual effect of only a few days. Therefore, repeated applications may be required.
4) Apply Beneficial Nematodes to the Soil (Recommended)
What are nematodes? Nematodes are microscopic roundworms that move within the soil, in search of a suitable host to enter. Once they penetrate and enter the host (like a curl grub), they release a specialized bacteria that kills the grub – so that they can feed on it, and reproduce! Once they eat through that grub, the nematodes venture out on the hunt for more. The added benefit over milky spore or Bt is that the grub doesn’t need to physically eat the nematodes. The nematodes seek out the grubs!
In addition to killing grubs, there are a number of added benefits to having a healthy population of nematodes in your garden soil too. For instance, they help augment the soil food web and improve soil fertility. Beneficial bacteria and fungal mycorrhizae play an important role in soil and plant health, but are immobile! However, they can “hitch a ride” on nematodes and disperse among the soil to do their good work. Some nematodes feed on bacteria and fungi too, which break down and release stored nutrients back in to the soil.

How to Use Beneficial Nematodes to Kill Grubs in Garden Soil
Different species of nematodes
If you’ve been around the garden block, you’ve likely heard of root-knot nematodes. Those are pest nematodes that infect and feed on the root system of plants (commonly tomatoes). Those aren’t the good guys that we are talking about here. Just like Bt, there are different varieties or species of nematodes. That said, be sure to choose a beneficial nematode strain sold and known to specifically kill grubs in soil. When you look at the packaging, you’ll notice that it says it kills white grubs – along with many other soil-dwelling pests!
This is the strain/brand of beneficial nematodes that we use.
Beneficial nematodes can kill other soil pests too
By inoculating your garden soil with beneficial nematodes, you’re likely killing several “birds” with one stone! And by birds, I mean pests. The strain of beneficial nematodes we use (Steinernema feltiae, aka “Sf nematodes”) can effectively control many other pests including: cutworms, fungus gnats, fire ants, weevils, root maggots, flea larvae, crane flies, white grubs, and many more!
One study even showed that the beneficial nematodes also help reduce the population of root-knot nematodes in soil. We previously had an issue with root knot nematodes in our garden soil, and that has seemingly gone away with the grubs too! Other species of nematodes target different pests. For example, Steinernema carpocapsae (Sc) Is great for organic flea control. As discussed in our introduction to organic pest control series, it is always important to identify your garden pests before acting.
If you have a pet, don’t fret! Beneficial nematodes are not harmful to anything except their target pest species. They will not harm mammals, aquatic life, birds, reptiles or amphibians. When applied correctly, beneficial nematodes should not negatively impact beneficial insects such as ladybugs, who have very different above-ground life cycles. They do not harm earthworms either!
Edit: A note about bees
It has been brought to my attention that some species of nematodes may be harmful to bees. This is particularly true if they’re directly exposed to the initial nematode application (e.g. if the bees are directly sprayed, or eat from a sprayed flower). Nematodes may also harm the larvae of burrowing bee species. Therefore, please take caution when applying nematodes in your garden. For example, only treat target areas, and do so low to the soil. Avoid spraying plants, especially those with flowers. Apply nematodes in the evening hours when bees are not active.
Do not treat soil where known soil-dwelling or ground-nesting bees are present. It should be noted that we have a very robust bee population in our garden of many species, including honey bees, bumblebees, and native solitary bees. We have not noticed any ill effects post nematode application in our raised garden beds.

How to Apply Beneficial Nematodes to Garden Soil
- Follow the instructions on your chosen nematode package!
- Keep in mind that you can buy beneficial nematodes in various amounts. The package should state how many square feet of soil surface it can treat, so do a little garden math first.
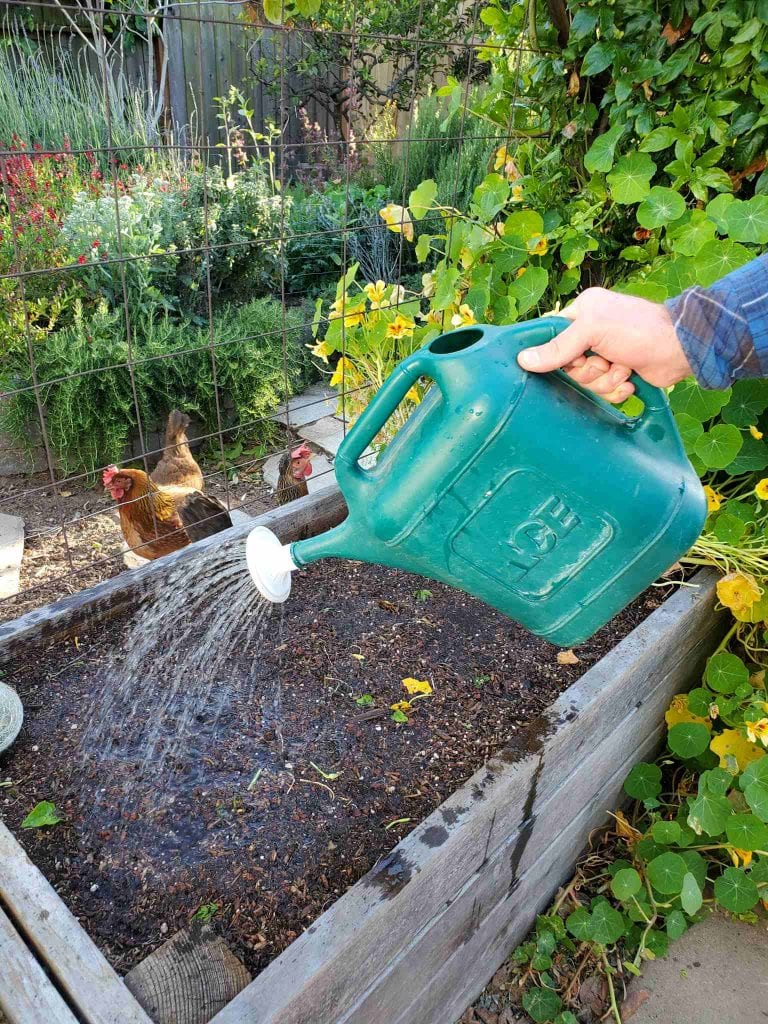
- Beneficial nematodes come in a powder that needs to be mixed with water. Once mixed, you can either use a pump sprayer or a watering can to apply them to the soil surface. We prefer the watering can method for our raised garden beds, as it is quicker and penetrates the soil more deeply. Using a watering can close to the soil surface also reduces accidental over-spray to plants or non-target areas, which is important for bee health.
- To reduce runoff and improve absorption, it is best to apply beneficial nematodes to already-wet soil. Thus, plan your nematode application either after a good rain or right after you’ve watered your garden. If your soil has a crust over the top or otherwise does not readily accept water, you may want to lightly aerate it before application (e.g. poke the top with a pitchfork or similar). The goal is to get those good guys down into the soil as quickly as possible.
- Only apply beneficial nematodes when the soil temperature is in the 40’s to 70’s Fahrenheit. Freezing temperatures may kill them. Hot temperatures over 80F can also kill beneficial nematodes, especially if you apply them to the soil surface on a hot day and they fry before they get a chance to migrate deeper. Therefore, apply nematodes in the evening or once direct sun is no longer shining on the soil surface. Do not treat if bees are active or present.
- If possible, apply a fresh layer of mulch on top of the treated soil immediately after nematode application (or the morning after). This will help keep them damp and alive, and also provide a buffer from above-ground bees.
- We treated our soil with beneficial nematodes only one time (one evening application) over the last year, and have seen amazing results. Yet some instructions say to treat twice over the course of the first week in order to catch the grubs in various stages of their life cycle.
- Remember, nematodes are living things, so plan to use them soon after they arrive at your home! They have a shelf life of about 2 months in the refrigerator, but can live for 18 months or longer in the soil, especially if there are suitable hosts present so they can continue their lifecycle.
What is the best time of year to treat soil with beneficial nematodes?
Treat your garden soil with beneficial nematodes whenever the curl grubs are visible and present! And, when the temperature conditions are ideal as described above. Spring and/or fall are generally a good time to treat in most locations. Curl grubs are most active in warm weather. Some sources recommend a spring application, as the grubs will be vigorously feeding closer to the surface on new plant roots in the spring. Yet others suggest treating in the late summer to fall, to kill the grubs when they’re still small – and the benefits will carry over to next spring.
I am not an expert on all the species of curl grub beetles, but I suspect that there are slight differences in each of their life cycles that would make spring versus fall more effective. Not to mention all of our varying climates. Therefore, if you are struggling with a severe infestation of grubs in your garden soil (or lawn), it may be best to treat twice per year.

And that is how you kill the nasty little grubs in your garden soil, organically.
I hope you found this article to be interesting and useful. Even better, I hope it helps you rid your soil of grubs, naturally! After all, grub-free soil leads to happy roots and healthy plants – exactly what we’re all after, right? Please feel free to ask questions in the comments below. Also, please spread the love by sharing or pinning this article. Thanks for reading!
Don’t miss these related articles:
- Organic Pest Control: How to Prevent Pests in the Garden
- Learn to Identify the Top 18 Garden Pests, Plus Beneficial Insects!
- Over 25 Ways to Get Rid of Pests in Your Garden, Organically!

Deanna Talerico
Deanna Talerico (aka DeannaCat) is a garden educator and writer with over 15 years experience in organic gardening. She is a retired Senior Environmental Health Specialist, and holds a M.A. in Environmental Studies and B.S. in Sustainability and Natural Resources.


50 Comments
Sarah Towne
My raised garden beds have basically become curl grub breeding lands lately. It’s insane! I’m grateful for your advice. The nematodes you recommended on Amazon apparantly cannot be shipped to my location (Southern California). Drat. Do you have any other suggested retailers? Thanks!
Aaron (Mr. DeannaCat)
Hi Sarah, that’s really odd they no longer ship to CA through the link, we can no longer order them there either being that we are in CA as well. Anyway, you can find the beneficial nematodes on Arbico Organics, the company is located in AZ so you should be able to get them relatively quickly. Hope that helps and good luck with your grub issue!
Sally
Deanna, I can’t tell you how glad I am to have found this post! You saved me. Two days ago I went to replant my raised bed garden. Two weeks prior. I had pulled out old stuff and amended the soil, but did not replant until a few days ago. I picked up my seedlings and went to begin planting and as I dug, I found 1 million of those disgusting little grubs. There were so many I couldn’t pick them all out. I called the nursery, but usually has great information, and didn’t like the answers. So I searched on your site and found the nematodes. I immediately went back to the nursery for the nematodes follow directions and install them and then planted. Hopefully everything will be OK now thank you again for all of your garden wisdom.!
Aaron (Mr. DeannaCat)
Best of luck to you Sally, we found beneficial nematodes to work the best when battling grubs and other soil dwelling garden pests, just be sure to apply them in the appropriate temperature range. Good luck and have fun growing!
Rick Murray
I am a cannabis farmer and the beetles are burrowing into my raised beds I assume laying the eggs. What can I use to kill them without hurting my plants?
Aaron (Mr. DeannaCat)
Hi Rick, unfortunately we don’t have experience with wood boring beetles but it would be best to know exactly what type of beetle it is before deciding on treatment. Check out this article from Clemson University, it may be something you have to treat during the offseason and may not require immediate action depending on how damaging they are. It seems most of the treatment options involve borate or other insecticides which need to be applied by a certified pest specialist and I am not sure if you want that around your plants. Good luck!
Barbara
I was glad to read there is a natural method for killing these guys. When I find these grubs, I place them in my bird feeder tray (untreated) as a treat for the birds! They love them.
Susan
Hi! I just bought beneficial nematodes to deal with grubsville in my soil. I think they’re building a little town under there haha.
Is it safe to plant spring veggies after treating the beds?
Should root vegetables be avoided in the area treated?
I don’t know why but the idea of treating grub problems with other bugs kind of gives me the yucks lol.
Thanks for your thoughts!
Susan
Aaron (Mr. DeannaCat)
Hi Susan, nematodes are beneficial and there is no risk with applying the nematodes before you plant out your veggies, we have even applied beneficial nematodes while we had plants growing in our raised beds. The main thing you want to be aware of is the outdoor temperature to ensure a higher success rate of the application. Hope that helps and have fun growing!
DENNIS BALSLY
How best to identify types of grubs we have? Just by location, we live in eastern NC.
I have seen evidence of june bugs but not japanese beetles which is the predominant thinking of local gardeners.
Im thinking of getting Japanese beetle trap just to confirm their presence locally…
My research indicates SR and HB are best to treat for japanese and june bug beetles. HB appears to be readily available online – SR not as much.
Your thoughts please?
Aaron (Mr. DeannaCat)
Hi Dennis, it looks like you are on the right track with HB and SR both offering protection against Japanese and June beetles, I would likely go with the HB as it is more readily available and seems to offer protection from a lot of other garden pests as well. Hope that helps and good luck!
Saba
How much nematode powder do you use per gallon of water?
Aaron (Mr. DeannaCat)
Hi Saba, I don’t recall exactly, the directions should be on the package though. If they state that “x” amount per gallon waters “x” amount of square feet, you will just have to do the math and try and split up the water to apply the proper amount. Hope that helps and good luck!
Louise
Hi
I have just found some grubs in one of my raised beds. They are curled up but are not white! There were some vivid green ones as well that I would say were young ones. They are not moving.
If I treat with nematodes do you have to leave the bed empty? Or is it ok to still plant?
Thank you
Aaron (Mr. DeannaCat)
Hi Louise, I would try and identify the grubs so you know exactly what they are and if they are a garden pest to worry about. I am not familiar with green grubs found in the soil, we typically have curl grubs and cut worms, in which beneficial nematodes will work for both. You can apply the beneficial nematodes whether your raised beds have plants in them or not, just be sure the temperature is right for successful nematode activity thereafter. Hope that helps and good luck!
Tracy McKillop
I am thoroughly enjoying reading your articles and grateful to have found you. It appears that Amazon is out of stock of the nematodes. I’m just wondering if there is somewhere else that they can be ordered from. Any suggestions would be appreciated.
Many thanks
Tracy
Aaron (Mr. DeannaCat)
Hi Tracy, we’re so glad you enjoy the website and we really appreciate your support! These nematodes are in stock although that amount is for 1000 square feet of coverage, not sure the amount of space you are trying to cover? They have a few different sizes from 5 million to 100 million although you have to look at each one separately as they aren’t all listed under the same product listing. You can usually find the same brand of nematodes at Arbico Organics as well. Hope that helps and good luck!